
Almost everything in the Impasto window can be hidden, moved, or floated. This page describes the default layout, and what each region is called, so the rest of the documentation makes sense; View > Show/Hide is where the visual parts are turned on and off.
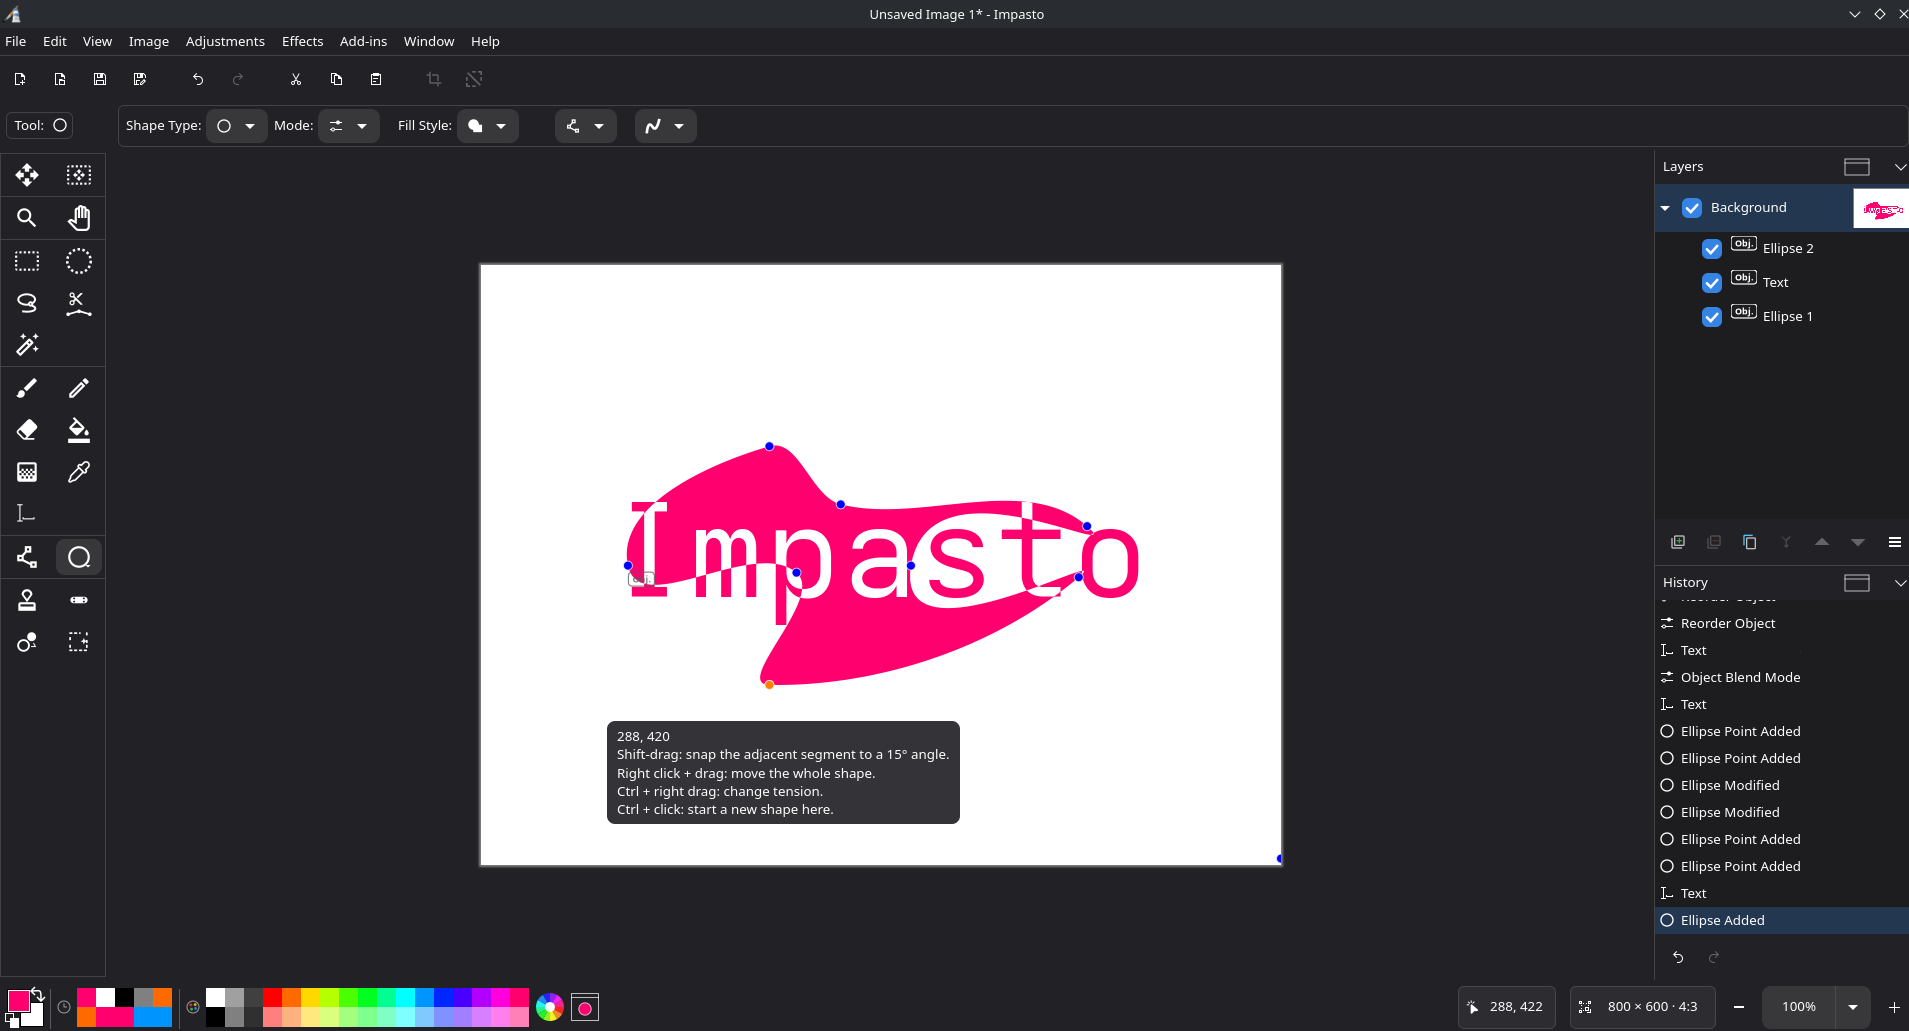
Regions of the window
| Region | Default | Menu entry |
|---|---|---|
| Menu bar | Shown | View > Show/Hide > Menu Bar |
| Quick access toolbar | Shown | View > Show/Hide > Toolbar |
| Toolbox column | Shown | View > Show/Hide > Tool Box |
| Tool options bar | Always shown below the toolbar | — |
| Image tabs | Shown when more than one image is open | View > Show/Hide > Image Tabs |
| Side dock with the pads | Shown | View > Show/Hide > Tool Windows |
| Status bar | Shown | View > Show/Hide > Status Bar |
| Rulers | Hidden | View > Show/Hide > Rulers |
On macOS the menu bar is the system menu bar at the top of the screen, and the Menu Bar entry is not offered.
The menu bar
The menus are File, Edit, View, Image, Layers, Adjustments, Effects, Window, and Help. Effects and Adjustments also collect whatever add-ins have contributed, so those menus grow as you install add-ins.
Edit > Settings… opens the preferences dialog, and Help > Keyboard Shortcuts opens the shortcut editor. Both are covered below.
The quick access toolbar
The row of buttons under the menu bar: New, Open, Save, Undo, Redo, Cut, Copy, Paste, and the rest. It can be hidden entirely from View > Show/Hide > Toolbar, or replaced with nothing at all through the UI settings.
The zoom control lives at the right-hand end of this row. It offers fixed steps from 5% to 3600% plus Window, which fits the whole image in the window. View > Normal Size returns to 100%, View > Best Fit is the same as choosing Window, and F11 toggles fullscreen.
The toolbox
A vertical column of tool buttons down the left edge, divided into sections by separators: Move, View, Select, Paint, Shapes, Retouch, and the user’s pinned tools. The toolbox overview describes every tool.
- Several tools share a slot, indicated by a small marker in the button’s corner. Press and hold the button, or click the marker, to open the flyout of the other tools in that group.
- Drag a tool out of the flyout onto the toolbox to pin it, so it keeps its own button instead of hiding behind the stack. Drag a pinned tool back to unpin it.
- Drag buttons to reorder them within their section.
- Each button’s tooltip names the tool and shows its shortcut key, which updates if you rebind it.
If the column takes too much space, Edit > Settings… > UI > Pick tools from a dropdown instead of the tool box hides it and replaces the tool name shown above the canvas with a dropdown listing every tool, grouped exactly as the toolbox is. Both can be shown at once: the setting switches the view when you change it, after which View > Show/Hide > Tool Box still works.
The tool options bar
Directly below the toolbar, this row holds the settings of the tool you are using: brush width, blend mode, tolerance, fill style, font, and so on. It changes completely when you change tools, and each tool’s settings are remembered between sessions.
If the row is too narrow for a tool’s controls, Edit > Settings… > UI > Wrap tool settings onto extra rows lets them wrap instead of being clipped.
The canvas
The image sits in the middle, surrounded by a glow in a shade of the canvas surround color. Around it:
- Rulers, off by default, turned on from View > Show/Hide > Rulers. Their unit is set under View > Ruler Units: Pixels, Inches, or Centimeters.
- The grid, off by default, from View > Show Grid. View > Edit Canvas Grid sets the cell size, the color, and the optional axonometric lattice. See Snapping and guides.
- Image tabs, one per open document, appearing above the canvas once there is more than one. Switch with Ctrl+Tab.
The docks and pads
The right-hand dock holds three pads, each in a collapsible panel:
| Pad | Contents |
|---|---|
| Layers | The layer stack for the current image. See Layers and objects. |
| History | Every step taken on the current image, and the way to jump back several at once. See Undo history. |
| Canvas | Settings for the canvas grid and the rulers, matching View > Edit Canvas Grid. |
Each pad’s header has minimize, maximize, and float buttons. Floating turns the pad into its own window you can drag anywhere, including onto a second monitor; the dock shrinks down to its icon strip when every pad in it is minimized, so it stops taking up a column of empty space.
View > Show/Hide > Tool Windows hides the dock and its pads altogether.
The status bar
One row along the bottom, from left to right:
- The palette: swatches, quick colors, recent colors, and the swap/reset buttons. This is where you pick and mix the colors you paint with; see Color and palettes. It can also be a floating window instead: View > Show/Hide > Colors shows or hides the docked strip, and Float Colors detaches it into its own window.
- The selection chip, which appears while a selection exists and reports its position and size.
- The cursor position chip, which can be turned off in settings.
- The image size and aspect ratio chip, also optional. Double-clicking it opens Image > Resize Image.
- The zoom controls at the right-hand end.
The row collapses gracefully as the window narrows: the image size chip slides out first, then the cursor position chip, then the palette tiles shrink and eventually fold into a popover, the quick colors going first and the swatch grid last. The zoom controls and the color swatches never collapse. Hover over any chip to see what it reports.
Settings
Edit > Settings… has four tabs:
| Tab | Options |
|---|---|
| Canvas | The default size and orientation for new images, and the canvas surround color. |
| Keyboard | Paste external images onto a new layer by default, and a button opening Keyboard Shortcuts. |
| UI | Popover hints, an extra row of darker colors in the palette, how many recently picked colors to keep, palette size, thin toolbox layout, wrapping tool settings, the tool dropdown, skipping the rasterize confirmation, the quick access toolbar, and the two status bar chips. |
| Backup | Export your settings to a file, or import them from one. |
Export Settings… writes everything - including your keyboard shortcuts - to a single file, and Import Settings… reads it back on another computer. If the file contains shortcuts, Impasto asks whether to replace yours or keep them.
Where the settings live
Impasto stores its configuration as plain files you can back up or copy:
| System | Folder |
|---|---|
| Linux | ~/.config/Impasto/ (or $XDG_CONFIG_HOME/Impasto/) |
| Linux (Flatpak) | ~/.var/app/com.github.zbcoding.Impasto/config/Impasto/ |
| Windows | %APPDATA%\Impasto\ |
| macOS | ~/.config/Impasto/ |
Alongside the shortcut file, Impasto keeps its recently opened files and, after a crash, any autosaved documents it offers to recover on the next start.